How to Install XYPLOT


This chapter will tell you how to get XYPLOT running on your computer.
Choose the section appropriate for your operating system:
Linux Installation
XYPLOT for Linux is distributed as a compressed tar (Unix Tape Archive) file
with the name
xyplot-pclinux-x.y.z.tar.gz
where x.y.z is the current version number. The distribution
file contains the source code files and a Makefile for
building the executable. To build xyplot on your Linux
system, your system requires the GNU C and C++ compilers (version
3.2 or higher is recommended) and the GNU assembler. Many packaged
Linux systems such as RedHat and SuSE (Professional edition) will
have these development tools installed by default. If not, they
may be installed from the original CD-ROMs. Also needed for building
xyplot are a version of the Motif graphical user
interface libraries. One may use either the
OpenMotif libraries or the
Lesstif libraries. For example,
see the Lesstif Installation Notes.
After installing either the OpenMotif or Lesstif packages on your system,
you may build xyplot by following these steps:
- Copy the distribution file (xyplot-pclinux-x.y.z.tar.gz)
to any desired directory.
- Change to the directory in which the distribution file
resides and unpack the contents:
tar -zxvf xyplot-pclinux-x.y.z.tar.gz
The distribution file will unpack to a new subdirectory called
xyplot-x.y.z. The unpacked subdirectory will contain all
of the xyplot source files (a set of .h, .cpp,
.c, .s, and .4th files), the
Makefile, and a README file, which also contains
installation instructions.
- Change the directory to the new subdirectory and build the
xyplot executable.
cd xyplot-x.y.z/
There are several options for building xyplot, but the simplest is
to type:
make
All of the source files will be compiled/assembled and the
executable file, named xyplot, will be made. You may
notice compiler warnings scroll by as the files are
compiled, but these may be ignored. Only if you do not have
an executable named xyplot at the end of the make process
has something gone wrong.
You can examine the file Makefile to see the other options
for building xyplot. Also, if something does go wrong during the
make process, you may need to edit the Makefile. For example,
the linker may not be able to find the necessary libraries on
your system and you may need to redefine the macro LIBDIRS in
the Makefile.
- To make xyplot accessible to all users on the system, move the
executable to a directory in the path for users, e.g.:
mv xyplot /usr/local/bin/
Note that you must be logged in as superuser in order to move a file
into the above system directory. After this is done, any user should
then be able to type xyplot at a command prompt and
be able to execute the program.
- Each user maintains customized settings in his/her
$HOME/.xyplot directory. For each user, create
the directory as follows:
mkdir /home/username/.xyplot
Next, copy the Forth source files (*.4th) provided by
the distribution into this directory
cp *.4th /home/username/.xyplot
When a user executes xyplot, the file xyplot.4th from
the user's $HOME/.xyplot will be loaded. XYPLOT can
be customized by appending Forth commands to the end of this
file. For example, other Forth files, called modules, may be loaded to
provide additional menu functions. The file smooth.4th
is an example of a module which adds an item called Smooth
to the Math Menu. The smoothing function is written in the
Forth programming language and this source code is loaded upon
startup from a line in xyplot.4th: include smooth.
This completes the installation under Linux.
Windows Installation
XYPLOT for Windows is distributed as a zip file xypw-1.1.3.zip
which contains the executable program file, xyplot.exe,
the loadable Forth modules (.4th files), and sample data
files (.dat). We recommend the following installation procedure
under Windows (95/98/etc.):
- Create a New Folder called xyplot. You can do this
by clicking on My Computer, then the desired drive,
then New and Folder from the File Menu.
- Move the distribution file xypw-1.1.3.zip into this
directory and unzip its contents using either
PKUNZIP or WinZip.
- The main program is xyplot.exe. In addition, there
are a number of modules (.4th files) which provide additional
functions, and sample data files (.dat files).
- You may create a shortcut desktop icon for xyplot by right-clicking
on xyplot.exe with the mouse, holding the button down, and
dragging the icon onto the desktop. This should be done from the
folder in which xyplot was installed.
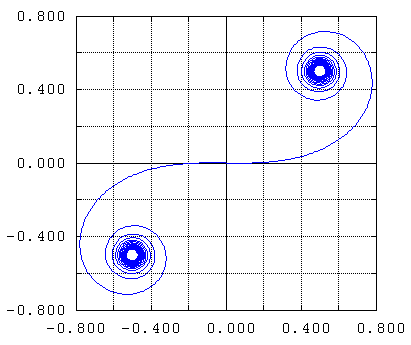
- Try launching xyplot using the desktop icon. Use the Open function
in the File Menu to load and plot one of the sample data files
provided in the distribution. For example, if you open the file
cornu.dat, you should see this image.
DOS Installation
Installation of XYPLOT on your PC requires you to do the following:
- Create a directory for the program files.
- Copy the distribution file (zip file) into this directory.
- Edit the initialization file in this directory.
- Modify the
autoexec.bat file for your computer to
include
- a path to the program
- an environment variable that locates the initialization file
- First create a directory for the xyplot files, e.g.
mkdir c:\xyplot
- Next, copy or download the compressed zip file (
xyp41.zip)
into this directory. Then use the program pkunzip to
decompress the files
pkunzip xyp41
- Now, modify the initialization file
xyplot.ini using
a text editor. The file as supplied will work for a computer with a
color VGA display.
edit xyplot.ini
- Edit the
autoexec.bat file of your system to include
the lines
path c:\dos;...;c:\xyplot
set xypini=c:\xyplot
After you reboot your computer, you may simply type xyplot
and the program will run no matter which directory or disk are current.
If you do not make the changes to autoexec.bat, you must
start XYPLOT by first changing to the directory in which the program
and initialization files are stored.